
Better films every fortnight. Subscribe to Syrp Lab YouTube.
Food videos usually go one of two ways. You'll need a napkin to catch the drool dripping down your chin, or they make you want to throw that greasy-looking burger in the bin. We know which one we prefer!
In our latest Syrp Lab Quick Tip episode, we shot a food delivery commercial that's a feast for the eyes. Broken into three sequences, these videos include a late-night staple in the form of a classic grilled cheese sandwich, a juicy chicken sando and a plate of purple jello that looks like it got delivered straight from a kid's birthday party in the 70s.
In this article, we'll walk you through the three different setups we used to create these tasty scenes and share tips and tricks on how getting creative with your lighting, rigging and art direction can take your next food shoot from average to mouth-watering.
Before we begin, here's a quick rundown of the kit we are using for these three videos: we are shooting vertically for reels using the Canon R5 camera with a 24mm and 50mm prime lens, along with a handy L Bracket and Move quick release from Manfrotto. We also used ProMist at a minimal strength of 1/8th to lower contrast a little, create a "pastel" effect and introduce some halation.
Let's dig in!
Midnight grilled cheese, anyone? – Video 1
For the opening of the ad, we wanted to perfect the ancient art of pulling apart a grilled cheese sandwich to create a stretchy pool of magnificent melted cheese.
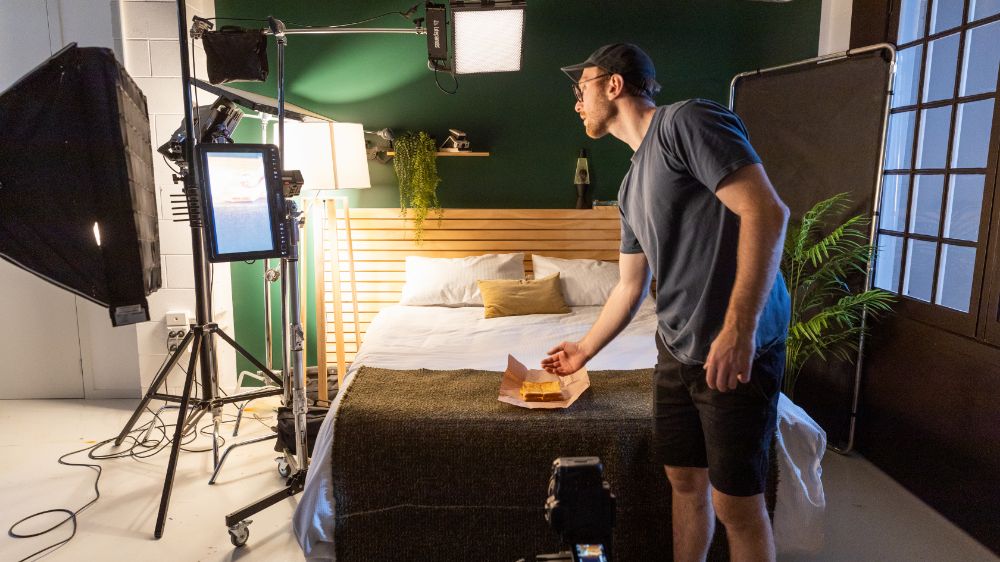
For the scene setup, we crafted a cosy-looking bedroom in our studio. With a blank canvas to work from, we decided to paint the back wall a deep forest green. This allowed us to get nice and low and shoot up through the sandwich.
For the lighting, instead of blue-tinged moonlight, we used a large lamp shining from the left that motivated all the other lighting to create a warm yellow look, complimenting the golden sandwich and adding to the cushy feeling of the space. Using a fixture, we boosted the light with a Gemini 1x1 shining through the lampshade itself. We also added a softbox Gemini 1x1 rim light from the left and another above to catch it off the edge of the arm and bring it off the background.
The warm lighting is balanced with a subtle Gemini 4x4 soft box top light that removes a bit of the global contrast, and finally, a 10,000 Calvin Gemini 1x1 shining through the window offers a nice bit of colour contrast. We also used Honeycombs and Egg crates on all the lights to control spill and direct the light.
The final element that brought this shoot together was the motion. Pulling back on the Magic Carpet Pro gave us sleek and smooth movement, a tighter framing of the sandwich and allowed for more space for the cheese as it started to stretch.
We opted to do this on camera, so we got the parallax. We also shot a top-down using the same set to pull the other shoots together, using the same lighting setup and mounting an overhead rig with the Genie Linear and slider gave us great rising movement.

Succulent chicken fakeaway – Video 2
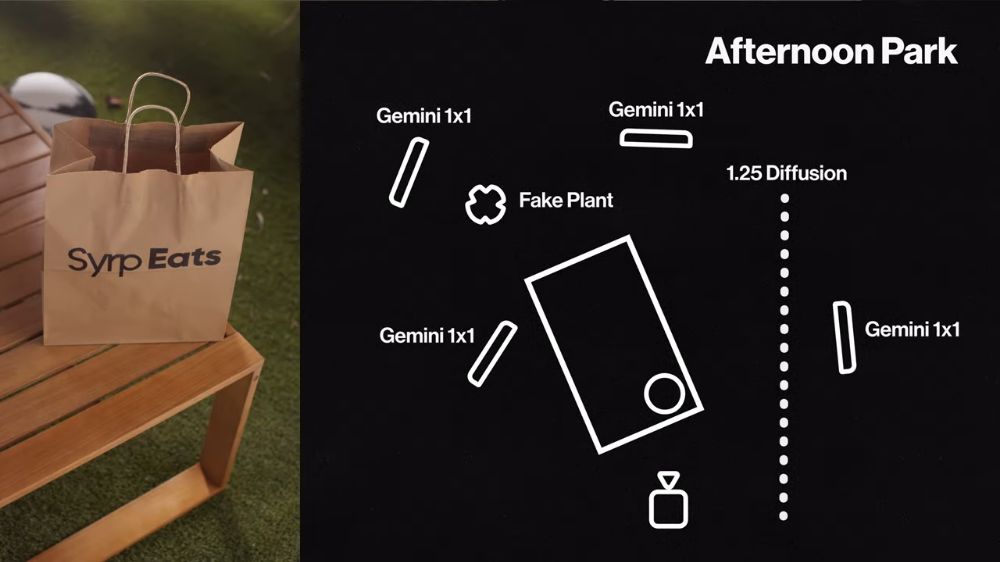
For the opening of the next sequence, we wanted to create an outdoor scene where our Syrp Lab delivery guy slams down our takeaway. The only issue was that we weren't actually outside, so we had to get creative in the studio to design a set that gave alfresco vibes.
We got this look using organic elements like textured fake grass and plants and shot using a high angle and 50mm focal length. This high angle helps compress the space, so you don't have to spend too much time and money dressing the scene. It also helps avoid showing the non-existent horizon, which you definitely want to consider if you are shooting an outdoor video indoors.
For the lighting at the back, we stationed a Gemini 1x1 single hard source, so it filtered through the fake plants. In this scene, the plants act as a gobo, creating shadows that add depth to the outdoorsy feel. It's the same technique used in our How to Shoot Great Cocktail Videos article.
To create more balance, we filtered a fill light through a large 1.25 diffusion screen to offer a sense of outdoor ambience. And finally, we added two rim lights to help pick up the edges of the bag.
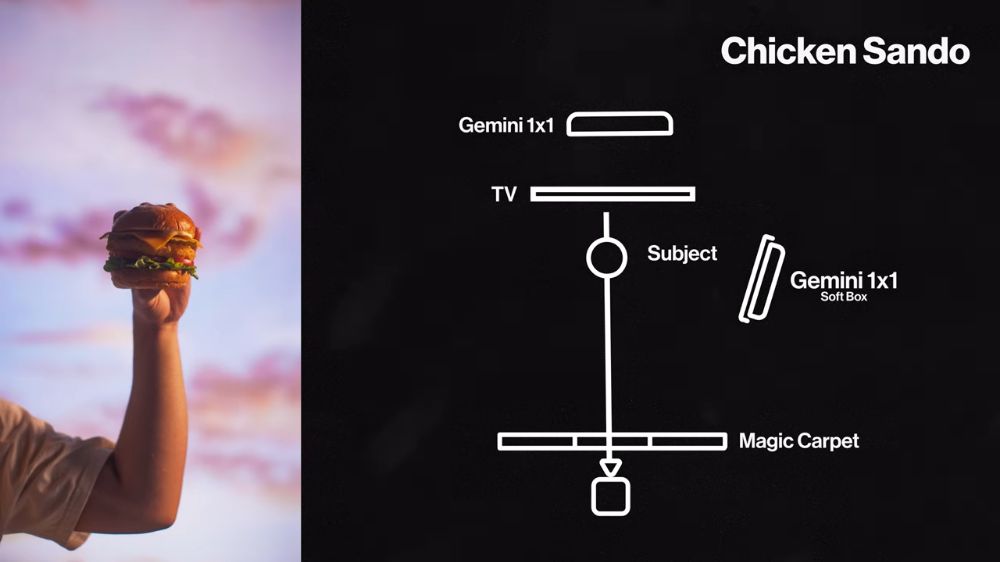
Part two of the sequence featured a lift-up of the chicken sandwich. We created this shot using a virtual background, and while it's no Unreal Engine, it's a step above standing in front of a scene on your TV with a Windows screen saver. This is, as we like to call it, virtual production lite. Our main man Matt created a custom LUT for the TV/Camera combo so we could account for the colour cast and limited dynamic range of the TV when compared to our source image.
For our camera, we rigged up a spinny rig using a long piece of speed rail that pivots on a sturdy tripod that's sandbagged down and then supported that at the other end with two Magic Carpet Sliders. We didn't just want a track and pan because we need the distance between the camera and the background to stay consistent otherwise things will go out of focus.
For the lighting on this shot, we based everything on the background image that gave light and colour to our subject. We complemented it by adding a Gemini 1x1 with a softbox on the right to offer a more motivated light and added another 1x1 above the TV to give the expertly styled bun some light-catching pop.
Retro jello vibes – Video 3
For the final shot in our ad, a hand brings in a delivery bag. Surprise, it's a plate of purple jello.
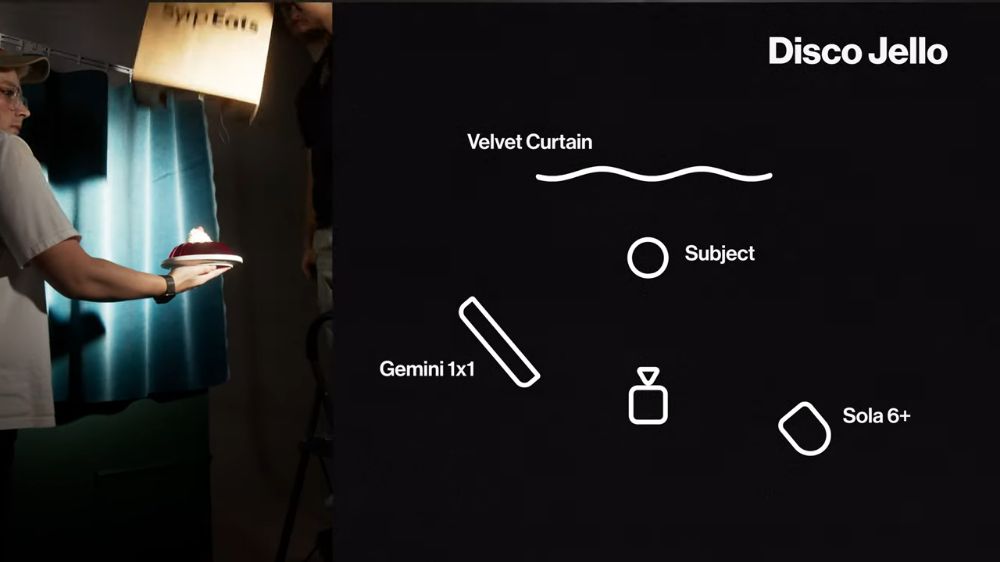
For this set design, we wanted to create a scene that captured the jello's nostalgic aesthetic, so obviously, we opted for plush velvet curtains that look really great with a directional spotlight.
The lighting for this setup was pretty simple. A single Solar 6+ fresnel on the right created focused directional light to give us a very stage-lights vibe. (Before LED panels, most film and theatre lights were Fresnel/Directional/Can lights) We didn't diffuse and wanted specularity on the Jello to work with our Star Fliter.
A single Gemini 1x1 situated on the left at about 10% helped fill out the shadows. The last element used was a Four Point Star filter that amplifies the streaks and helps with the overall look. The jelly isn't specular enough to get obvious star streaks, and to be honest, they do work better on shiny, metallic objects. However, the filter does offer some nice halation, softness and a star texture to the reflective highlights and at around $50 bucks a pack, these Star filters are worth a shot if you want to try them out.
Lastly, we used a Syrp Lab classic shot, bringing the camera from directly in line with the subject to facing down on top of it. We got this shot by building a rig from speed rail and Avenger clamps. The camera, secured to one end of the speed rail, is counterbalanced by a weight at the opposite end, allowing it to pivot on a light stand. We then used a Genie One on a slider to control the movement, letting it pull up at a consistent speed. Having an axis of rotation centred perfectly on the plate allowed us to do repeat shots to match-cut the jelly away.
There you have it. We hope these set designs, lighting and rigging setups have inspired you to bring your next food shoot to mouth-watering new levels. Bon appétit!
For more filmmaking and photography tips and tricks, check out some of our other articles and videos on our Syrp Lab Youtube.