
Better films every fortnight. Subscribe to Syrp Lab YouTube.
There’s food videos, and then there’s crisp, mouth-watering food videos. You know the kind. All the difference? It comes from really good lighting and production design. A thoughtful set-up can add a whole lot of spice, turning an average scene into a decadent product embedded in its lived environment.
We like to build a whole world around a subject, playing with the mood and inviting the viewer in. Vibe architecture, if you like. We thought we’d demonstrate with cocktails. In this Syrp Lab Quick Tip, we’re walking you through 5 different setups for 5 cocktails, sharing a few of our best tips and tricks to take your next food video to mouth-watering proportions.
We’ll walk you through how to build a scene around each drink and highlight its qualities. These tips and techniques are useful no matter what gear you have on hand, and whether you’re shooting video or stills.
We’re going to cover lighting, production design, motion, camera settings and a few other tricks we have hidden up our sleeves.
Now, cocktail anyone?
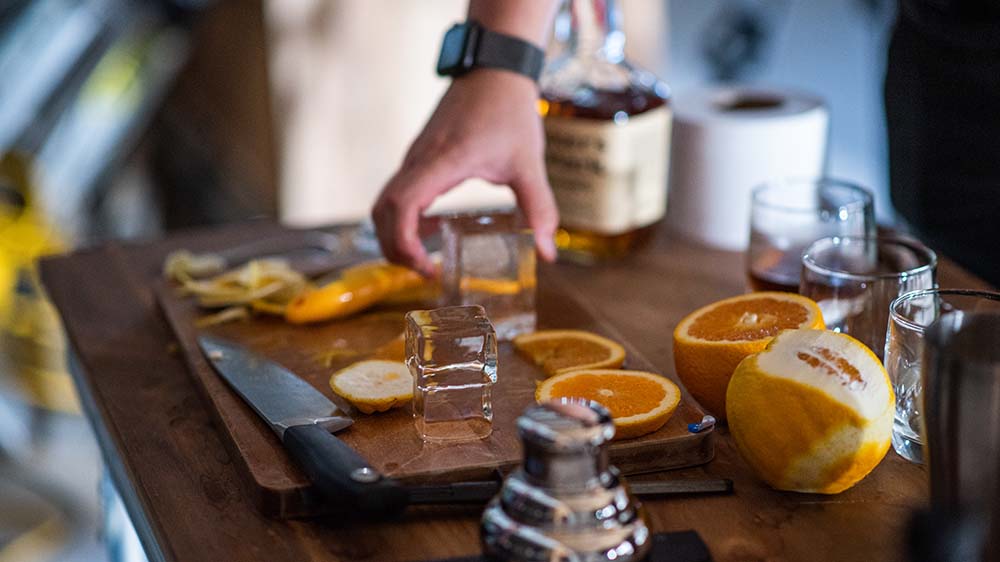
The 60’s Shady Motel Look - Shot 1
This one’s bringing the nostalgic vibes - think roadside retro and up-to-no-good. This look is actually very in vogue with small bars and bistros at the moment. Let’s dig into the details.
We used props from our local prop house, and chose them to compliment a panelled background. We used a burnt orange pleather table to give a contrasting pop, as well as a few other bits and bobs you might find in a vintage hotel.
Now, lighting. What we’re looking for is a directional single shadow, and you want to make sure that only one light is hitting the table to get this sharp effect. If you have two light sources hitting the same object, they can create a blurry double shadow that muddies the image. Not what we’re after.
We used Sola 6 + Fresnels from Litepanels because they can give us a narrow, focused beam of light. Then, you want to cut any spill with Scrims. In our case, we used barn doors to get that light shaping good and sharp.
Your main Fresnel is really doing the heavy lifting with this, so you want to make sure you position them just right. We started with our directional fresnel from the left, and positioned it high and fairly far away to get a long shadow.
Then, we set up another fresnel further to the left to shine directly through the drink. This’ll give it a warm glow. The cherry on top is a rim light from the right to give the top of the ice some sparkle. We used a Gemini 1x1.
Lastly, we used a third fresnel in the background to light up our panel wall, so we could control the brightness independently. This also gave us a subtle radial gradient. And voila! Some key elements to build the feel of this bygone era around your product. We can practically hear Sean Connery by the pool.
The Classic Food Magazine Style - Shot 2
For this one, think Bon Appetit or New York Times Food vibes - a simple set up that makes your product pop. To get this effect, it’s best to use large matte geometric objects, which in our case was a plinth, a roll of Savage background paper and soft light that gave a delicious diffusion over the subject itself.
You want to manage reflections on the drink itself, as well as lighting up the background paper evenly. We used a roll of Savage background paper in coral.
Nothing ruins a beautiful product shot like a wilting, melted product, so we always do a dry round first with just a piece of paper in the glass. Our actual drink was going to melt in about five minutes, so that way, we’d had a bit of practice and were ready to snap the winning shot at its freshest.
You’re looking for a nice even gradient on the background paper. To get this, you’re going to use the inverse square law. For the non-mathematical of you out there, it’s not as complicated as it sounds. The further away a light is from its subject, the more gradual the fall off is going to be. So, distance is our friend - you want to move the light further back and up from the product.
When shooting portraits or editorial outdoors, we use a shallow depth of field to separate our subject from the background and draw attention to them. But when in macro, the depth of field becomes so narrow at low F stops that we need to increase this, ensuring the whole product is in focus. So, we brought our f-stop to about 13, because that’s how bright our lights were.
In keeping with the simple look, we only used a couple of lights. First, a Gemini 1x1 to light up our background from above, giving an even falloff. On the plinth and the drink, we used another 1x1 with a Softbox to create soft shadows and highlights from the side.
While we kept a low contrast ratio overall for this scene, we didn’t want a totally washed out result, so we avoided lighting from the front. There you have it, a crisp, food magazine-esque cocktail shot.
Sci-Fi Vibes - Shot 3
Think mysterious, future-spec. Clever production design is key here - we went with a black background, some nice back lighting and a reflection of the product directly underneath. To get this reflected, we used a black sheet of Perspex. This isn’t a step to take shortcuts with - the Perspex needs to be new, unscratched and with the protective film freshly peeled off. Avoid dust if you can, too.
Here’s where it gets a little fancy: we’re going to use specialty clear ice, which is frozen from the bottom to clear out any air or other bits and give a really clear look. We got ours from the Bar Society but you’ll be able to find it at plenty of specialty suppliers in most places around the world. This may be a little trickier to source than fake ice, but it’s worth it. The fake stuff looks, well, fake.
Transparent objects love backlighting. We went for a single source above and behind our cocktail to stream through it, giving it a nice glow and highlighting the edges of the glass. With a backlight, lens flares can be a bit niggly. To combat this, you can cut the light using a scrim, a floppy or a Matte Box on the camera itself.
Now for the lights. For the wide shot, we used a simple Gemini 1x1 LED panel above and behind the cocktail, with a black Manfrotto Pro scrim acting as our backdrop. You want to illuminate the glass, but avoid any reflection of the light panel in the Perspex. For our rotating close-up shot (remember, sci-fi vibes), we used a Genie Mini II and a product turntable. You can substitute a lazy susan here, but it won’t give you quite as much control.
The key to this kind of shot is getting everything centred up, which will stop any left to right movement as the cocktail rotates around. We used a laser level to make sure all the centres of the objects were aligned, and controlled it using the Manfrotto Motion app.
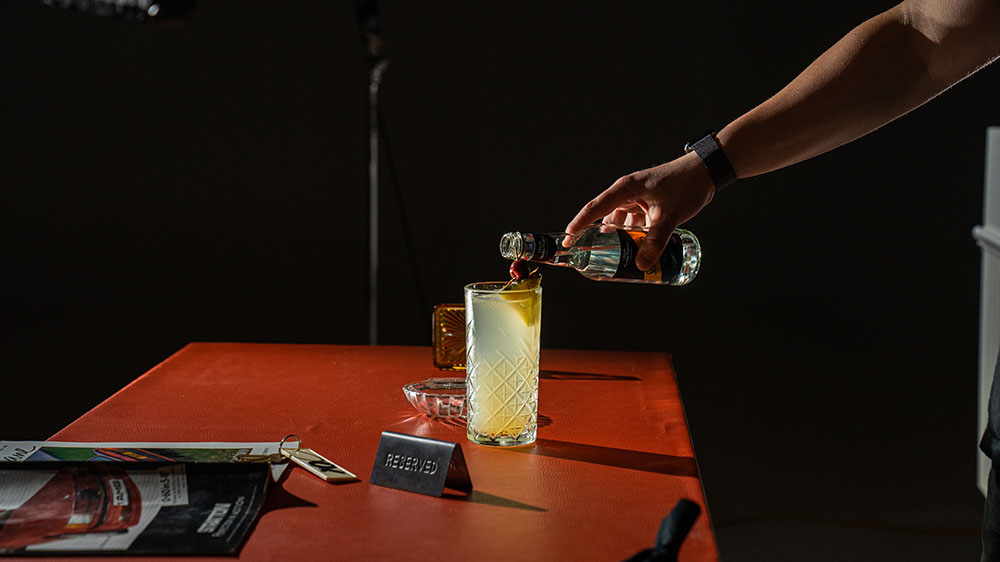
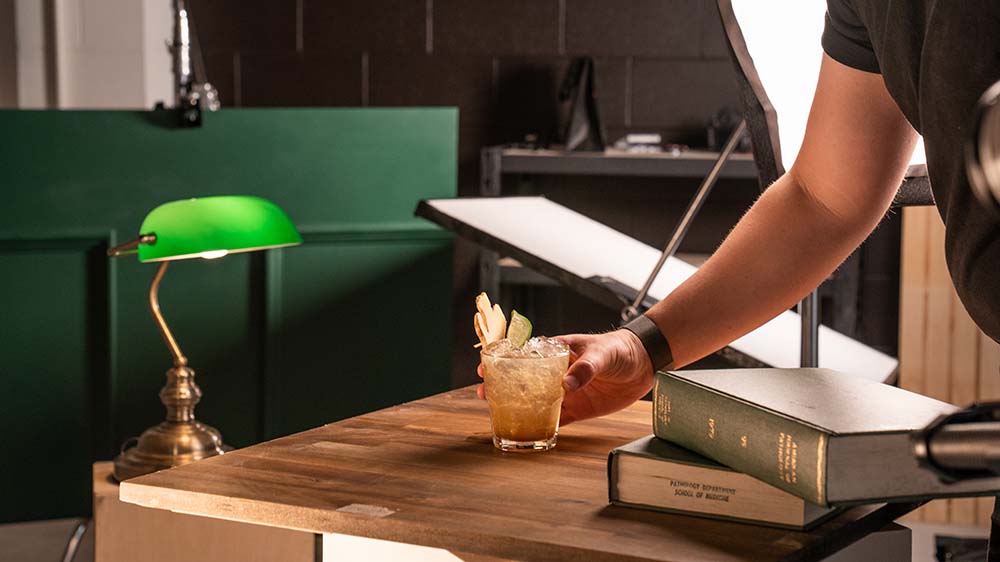
An Afternoon at the Library - Shot 4
Now, here’s a classy number. The scene you’re building here is all about soft motivated light, complimentary production design and depth of field. In our set design, we kept to warm, earthy greens and browns to mirror the feeling of old books in a library.
To create some texture in our scene, we used a dark wood benchtop as our surface and a piece of painted green MDF with crown moulding as our back wall. This scene is all about depth.
We wanted to use the lighting to make it feel like our product was in a big room near a wide window. So, we created soft diffused light as our fill and continued these feels when lighting the background. The idea was to cast a shadow to mirror the way light would hit a windowsill.
For this shot, we built light around the practical (in this case the lamp) to create a sense of a real space versus a studio. We didn’t want a hotspot on the lampshade, though, so we dimmed the light and used a Gemini 1x1 LED panel facing the glass to act as a rim light.
For our key light, we added a Gemini 1x1 panel to the right with a Softbox. We complimented this with our Gemini background light, cut with a piece of poly and an Avenger Foamcore Clamp to create that shadow.
To make it look like the main light is coming in from that single source (a spacious window), you want to make sure your light is consistent in direction.
The combined effect of this lighting and design? A textured, classy scene that makes you want to settle in with a book. All it’s missing is the smell of worn pages.
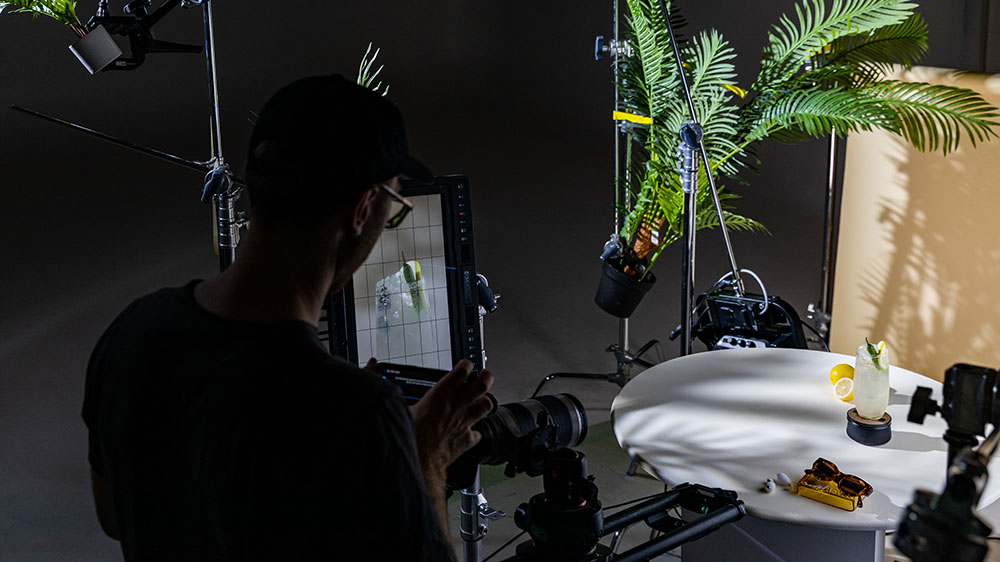
Breezy Summer Day - Shot 5
Here, we’re creating summery, garden party feels. A key part of this is making leaf shadows, to give the impression that we’re somewhere with sunlight and plenty of plants. We used plastic plants.
We’re back to crisp shadows, so that means focused, direct lighting. And a quick maths recap: the distance between the plant and the light needs to be greater than the distance between the plant and the subject. We also want to create the effect of warm sunlight bouncing off various objects.
We used an Avenger C500 Pelican Clamp and a C stand to make things happen. We started with our key light, a Sola 6+ to the left, with some plants casting shadows across the table. To balance this, we used a white poly bounce on the right of the cocktail, opposite to where that light was coming in. This bounced some light back in and filled in some of the shadows.
Then, we used a Gemini 1x1 for backlighting to illuminate the drink from behind and catch the edge of the glass, and finally, another Sola 6+ fresnel to the left to create our background shadows. This, we balanced out with a Gemini 1x1 LED panel at the back right, softening out those shadows.
This one’s got a fair amount going on lighting-wise, but it totally pays off by bringing the cocktail and its bright summery scene to life.
To keep the footage dynamic, we remade the drink just before we shot with fresh ice, so it was crispy with nice sharp edges. We topped it up with a bit of soda water so there was some fizzing, crackling energy going on, and we were on our way.
So, there you have it. Some tips and techniques to take cocktail hour and your next food video project to all new levels. Let us know how they worked for you! We love to see what the Syrp Lab community comes up with.
For more filmmaking and photography tips, subscribe to Syrp Lab. We only send emails worth getting.