
Better films every fortnight. Subscribe to Syrp Lab YouTube.
Please note, we may earn a commission from purchases made via links on this page as an Amazon Associate.
When it comes to audio, a piece of fine filmmaking should only ever be paired with sound of the crisp, clean variety. Our Syrp Lab gear room wasn’t quite delivering, so we decided to do something about it. We’d already given our space a makeover, and it was time to bring the sound quality up to speed.
If you hadn’t already figured it out, we at Syrp Lab love to create stuff. From films, photography and the kit to make that happen, to DIY projects of every shape and size. And, we’ve found that the space we’re creating in, is almost as important as the project itself - especially when it comes to recording sound.
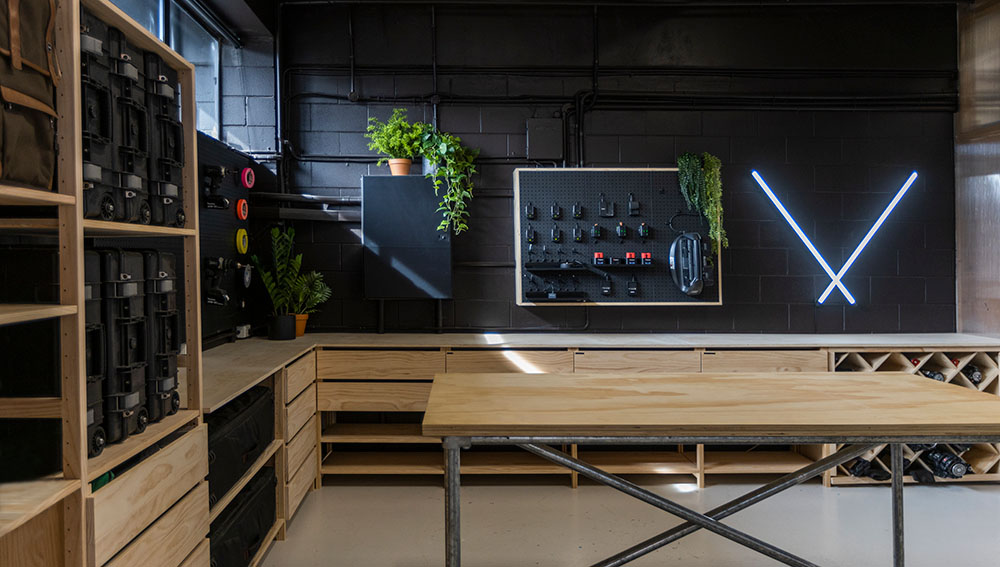
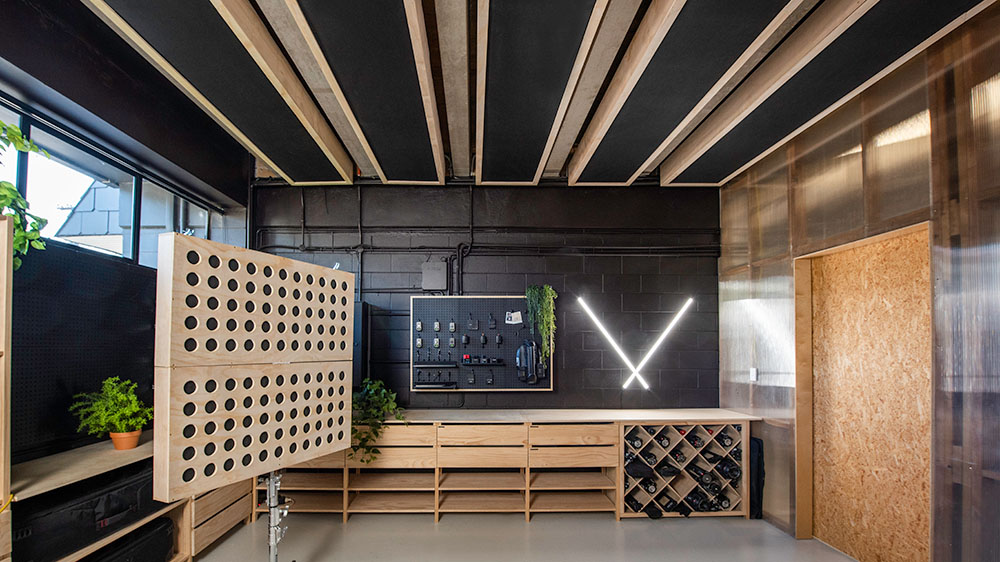
Our gear room is a 5x5m (16.4ft x 16.4ft) block wall room, and while it looks awesome (you can see the makeover we gave it here), it does not sound good. We know a thing or two about visuals, but we’re not quite so pro when it comes to audio, so we decided to call in the big guns. Sometimes, wisdom is knowing when to outsource.
We got Timo, an audio expert and head of innovation at Rycote and JOBY audio, on board, and he talked us through the main elements for getting the crispy, clean sound we were dreaming of. We’re going to take you through what we learned, and the step-by-step of our sound-treating build journey. Ready?
First off, what makes for great sound?
Timo gave us the lowdown on the key elements:
1. Mic pattern and position
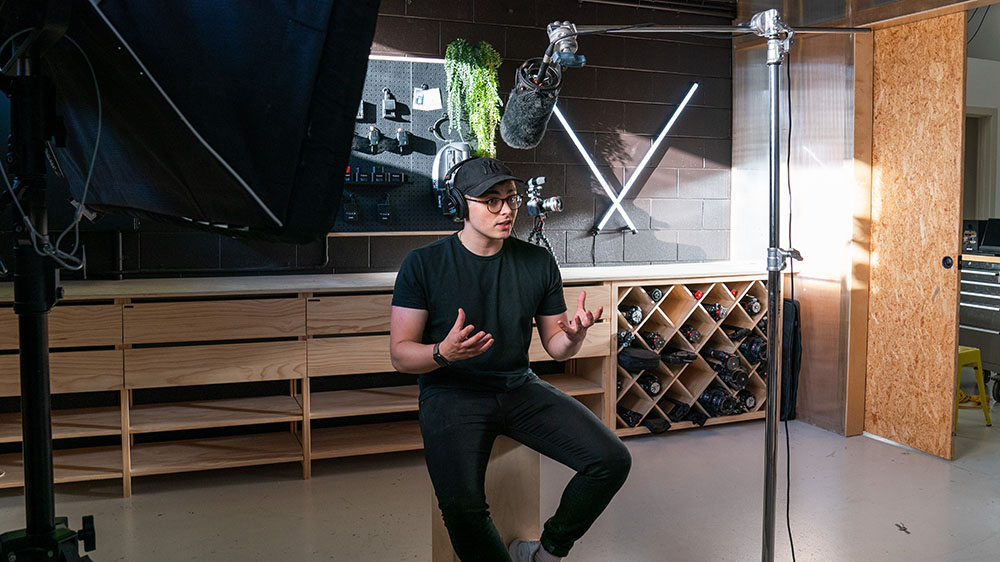
This might sound obvious, but microphone choice and position are super important. You’re going to get the best sound when you use a good quality mic, and it’s is close enough and angled to pick up direct speech with as little of the room reflections as possible. When it comes to mic selection, one of the most important things to know is the Polar Pattern (also known as Polar Response). This shows, in a 360 view, where your selected mic is sensitive to sound and where it is not. By choosing a shotgun mic with directional response, we can pick up more of the direct speech while reducing some of the reflections coming in from the back and sides.
We’ve got a few go to’s for mics: the Audix A131 Large Diaphragm studio condenser for voiceovers in our booth, as well as the Rycote HC hypercardioid shotgun range for on-set audio. The Rycote Invision Studio Kit combines mic suspension and a pop filter system to control for both position and sound quality.
But what if there’s still a lot of reverb? Then it’s time to look at your space.
2. Room size
The bigger the room, the better. We’ve all heard the awful echoing of bathroom recordings, and the world doesn’t need any more of those. If you can’t change the size of the room, bookshelves are a great way to scatter reflections.
Luckily for us, we have plenty of shelves to disperse the reverbs in our room, but it’s still pretty tiny.
So, we listened to Timo. We placed our mic correctly and opened the doors to make the space bigger, which made a difference. But it still wasn’t quite there, and we had our sights set on clean sound.
We decided it was time to modify our space, and build some absorbent wall panels; a big project, but do-able. If that’s sounding about as do-able as directing the next Marvel blockbuster, don’t worry - we’ll walk you through the whole process.
We did ours for a whole room, but it’s also totally possible on a smaller scale for a YouTube studio or home office. Imagine your room is a six sided cube, and we’re basically trying to prevent sound from bouncing from the ceiling to the floor or from wall to wall. To break this reverberation, you only need to treat the floor (if possible), and one of each of your parallel walls - that’s three surfaces in total.
When possible, always start with the simplest option, which would be laying carpet on the floors. For us, this wasn’t an option, so we had to treat the ceiling instead. Hopefully you’re luckier, and if carpet’s an option, take it!
Ready to get stuck in? Let’s do it.
Step One - Employ some gadgetry
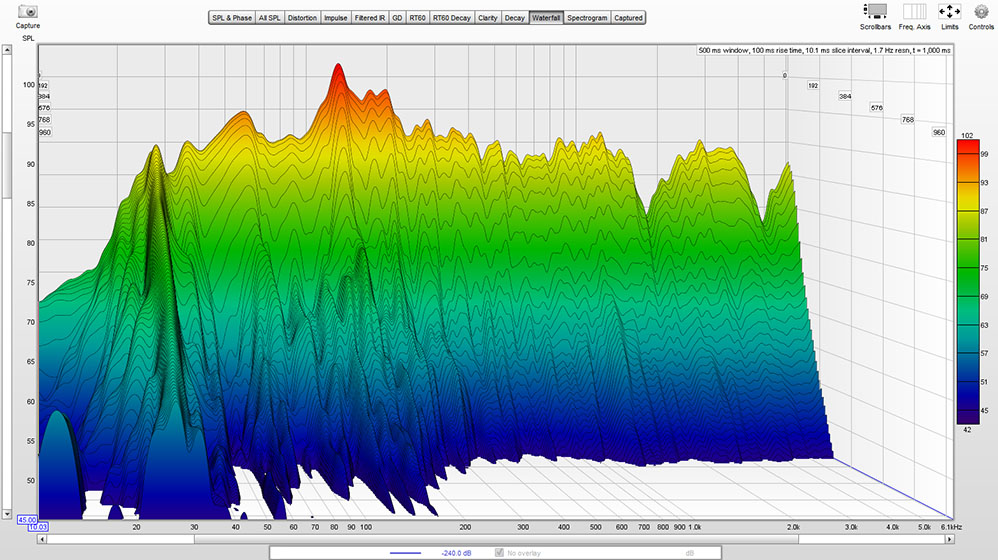
Sound can be a hard thing to get your head around and talk about if you aren’t a professional. Sometimes, without putting a finger on it, all you know is things simply aren’t sounding good. So to give us an objective judge, we used a free tool called Room EQ Wizard.
Using a waterfall test with the Room EQ Wizard software, you can measure the reflections and reverb, and get a graphical representation of the reverb time across a range of frequencies. Here’s a simple YouTube tutorial to help you on your way.
Our data isn’t going to win any research awards, but it was definitely helping us to know if we were heading in the right direction.
We decided to test it out by measuring what a really bad room sounded like. So, we headed for the Syrp Lab bathroom. Sure enough, it was off the charts. Well, nearly. It was hella reverby, anyway. The room is tiny with hardly any objects to break up the sound, so it was bouncing back and forth across the parallel walls. This was exactly the kind of thing we wanted to avoid in the gear room.
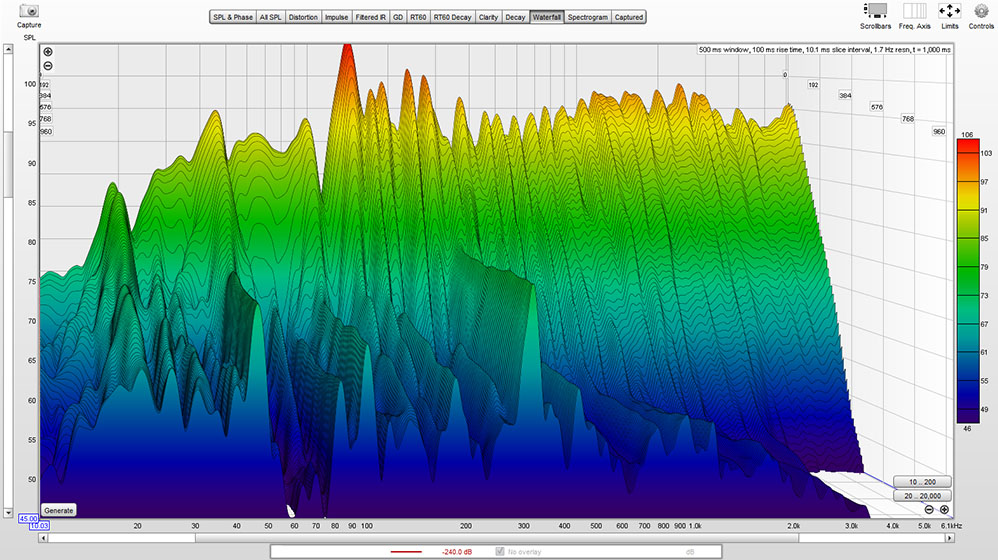
Back at HQ (the gear room), our graph was looking better than the bathroom, but that’s not saying much. We had our work cut out for us.
Step Two - Building the panels
We decided to build some 4.5m x 0.6m panels that would fit into the ceiling cavities to reduce any reflections through the roof. We also thought making some smaller, portable sound panels would be a good idea, to absorb and scatter some of the sound in the room. If you’re giving this a go, or are toying with the idea, you can downlaod our DIY sound absorption panel plans here, when you subscribe.
Basically, we decided to build ply frames and fill them with insulating acoustic rated rock wool which would act as a giant absorber for reverb. Then, we would cover this with fabric.
Once we had everything drafted up, it was time to get building.
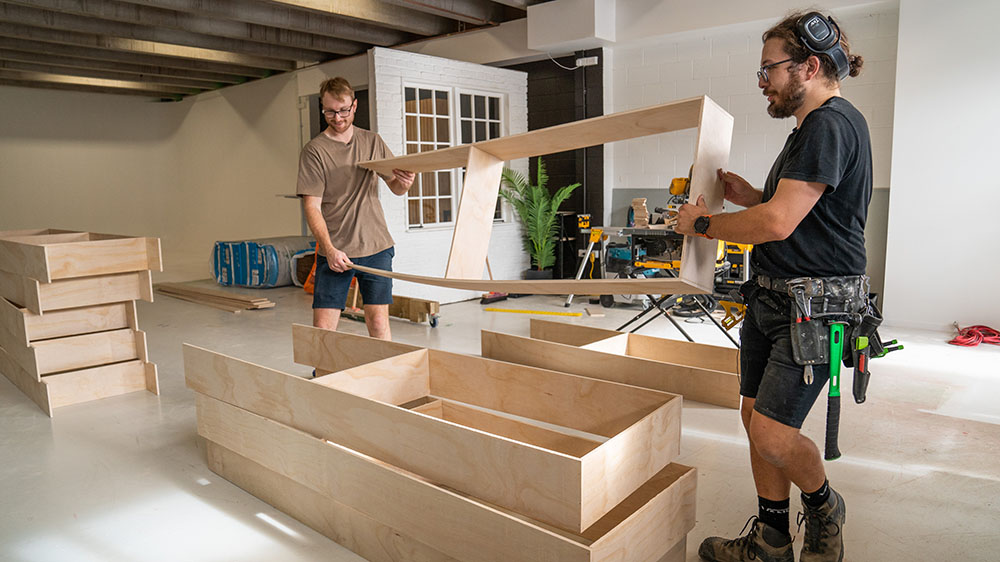
1. Frames
To kick things off, we started simply, by building the wood frames. Our plan was to rip the ply down into 195mm strips (17.7 inch), screw it all together and voila. Once we had the boxes made, there were just a couple more steps before we added the insulation.
We added reinforcement in three ways. First, by adding a plate to join the two boxes together, giving them the strength to run the length of the room. For the nitty-gritty on how this worked, definitely have a watch of the video.
Then, we put some little triangles into the corners of the boxes. This would hold them nice and square and provide a mounting point for fixing to the roof. Lastly, we added a strip along the face of each box, which would hold it straight and cover the edge of the fabric. Again, we’d definitely recommend heading to the video to get eyeballs on this process.
With the boxes all together, we gave them a quick sand and called it a day. We needed some beauty sleep before turning these bad boys into sound panels.
2. Fabric and rock wool
We needed to put some acoustic-appropriate fabric on the open faces of the boxes, before we filled them with the rock wool. We picked up ours from an industrial fabric supplier that specialises in stuff like this, but it shouldn’t be too hard to source locally wherever you are.
The fabric has a big job: it needs to be open enough for sound to pass through, as well as strong enough to hold all the fibres of the rock wool in. If the material is too dense, the sound can just bounce straight back off. That would be counterproductive for obvious reasons, so the fabric you choose is important.
We found this full write up when we were doing our homework, sound absorbing acoustic fabric, and it’s worth a read - you’re welcome.
We decided to add a Stud Strip into the middle, to support some of the weight and prevent any sagging. Then, we stuffed in as much rock wool as we could - this equated to about two sheets per bay. This would reduce the reverb from any bouncing sound. It won’t work particularly well for very low frequencies, but by making them thick enough, we’d be able to get rid of a bit of the ring in the room.
We finished adding our fabric and covered the edges with a trim, using wood PVA and a brad nailer to tidy it all up. And, hey presto, we had our large ceiling panels done, ready to mount to the roof.
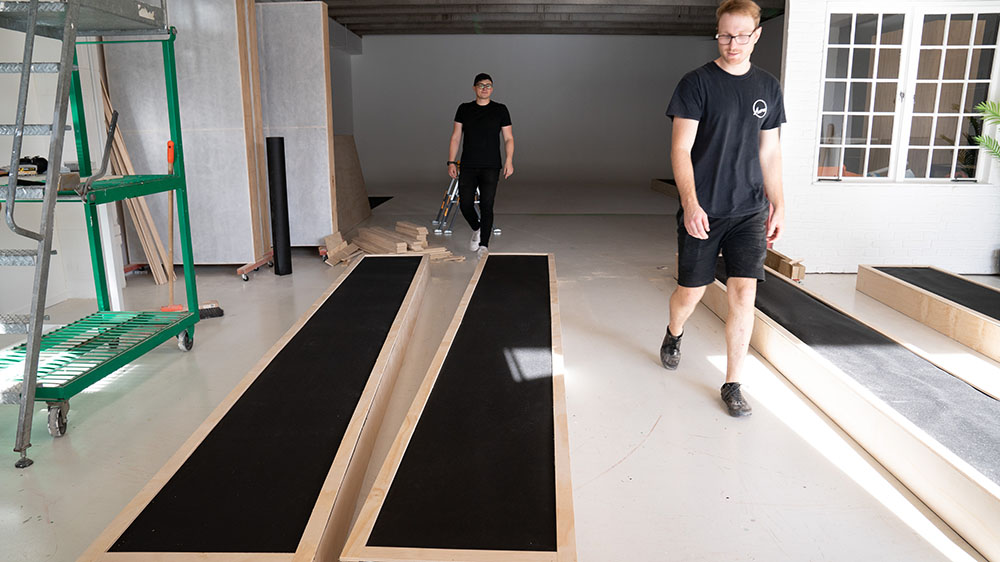
But we weren’t quite done. Why stop now, when we were on a roll? Our ceiling panels are great, but they’re very large. They’re unwieldy, and we’re not exactly able to pack them up and move them around.
So, we decided to build some smaller, more portable folding panels. The idea was that we could use these smaller versions to break up the reflections on the left and right parallel walls of our gear room.
3. Building Mini-Me’s.
With a smaller size and a reduction in thickness, there’s obviously a limit to how much sound these guys would actually absorb. But that’s the eternal tradeoff: finding the balance between size and portability, and quality. With the right placement, we figured we should still be able to get an improvement in our sound.
Basically, our model was a plywood box which would be stuffed with the same insulation as the larger panels, covered in sound fabric and a perforated plywood back for protection. We added a hinge between the two boxes so that they could fold, and then attached latches and a Avenger Baby Plate, allowing them to be mounted on a Avenger A5012 folding roller light stand. Not too shabby for a DIY job.
With all the panels done, it was time to mount them, and see if we had made any improvements to our audio.
Step Three - Proof in the pudding?
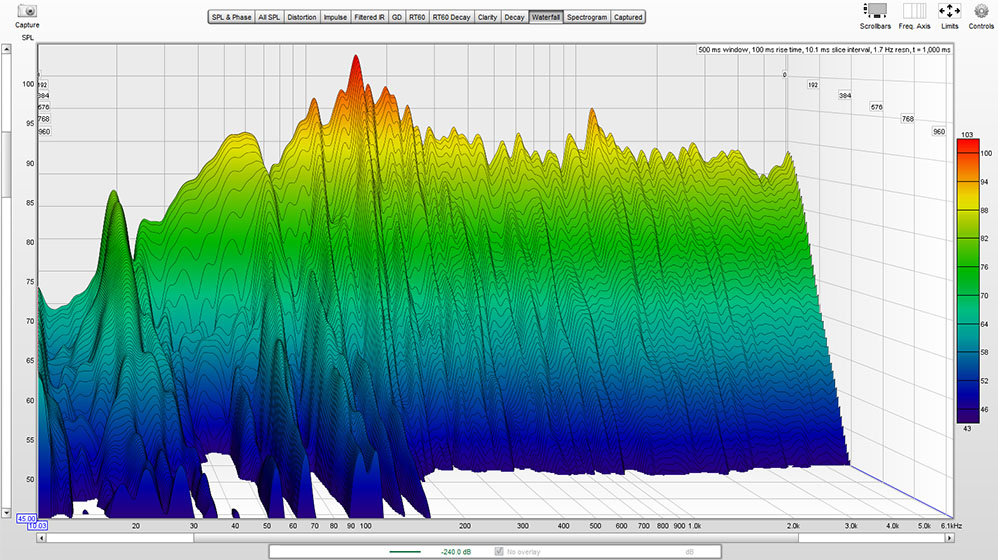
It was back to Room EQ Wizard to see how we’d done. Above about 170Hz, we got some pretty good reduction, from about 550 milliseconds down to about 150 milliseconds. It wasn’t as effective from 100Hz down, but this was what we were expecting.
Overall, we were happy. We’ve got some pretty effective DIY sound panels, and they look good. So was it all worth it? There’s definitely still a bit of reverb in the bass, which we can see in the waterfall graph. But for our budget and time allowance, we got significant improvements which we were stoked with.
Is it perfect? No. Is it much better? Absolutely. If we were at 20% before, we’re at 80% now. Above this and you’re in the range of diminishing returns, where it’s going to cost a whole lot more to make it perfect.
We’re many things, but we’re not audio perfectionists, so this is probably good enough. We’ve got clean, clear sound that we’d be happy to record for our projects. And the good news is, it’s totally doable, whatever size space you’re working with.
Keen to improve the sound in your space?
With a little bit of thought, you can make some significant gains and we've made it even easier by making our Sound Panels Guide available to download, Just follow the below link to improve the sound of your space.
If you’ve got any ideas of what you’d like to see us make, fire them through in the YouTube comments. We’re always up for another project. Happy filmmaking, team!