
Better films every fortnight. Subscribe to Syrp Lab YouTube.
In this Film Science episode, we dive deep into Native, Varient and Dual ISO, how it works, whether it matters, and what the best settings are for clean, noise-free footage.
ISO is usually one of the first things you learn when filming. So you probably already know that if you crank ISO up, you'll make your camera more sensitive to light, making everything brighter, with the downside being you also add more noise.
You probably also know your camera has a native ISO or even a dual native ISO, where it performs the best with the least noise. You might even know that ISO has nothing to do with exposure. It's just the organization that sets Global standards. But what you probably don't know is that all of this is one massive over simplification because, on some cameras, ISO has no impact on your final footage.
In this article, we'll walk you through the basics of ISO in digital cameras. We road-test three cameras with different ISO gain methods and show how you can achieve the least amount of noise in your footage.
Back to basics: How ISO works in digital cameras
When shooting video, light comes through your lens, it hits the sensor and results in an image, but what if that image isn't bright?
You can change the shutter speed or open the aperture to let more light in, but sometimes this still doesn't cut it. Your last option is to crank up the ISO or increase your sensor's sensitivity, but this doesn't always work.
The sensor measures light as voltage and converts it to a digital value using an Analogue to Digital converter. But if the image needs to be brighter, like, you need those values to be higher, it can't increase the size of the photosites to capture more light, but it still needs "more signal".
Depending on your camera, it can do this either digitally by changing the RGB numbers, electrically with a physical chip boosting the voltage or a secret third way – which is, unfortunately, a closely guarded secret!
The wild thing is from camera to camera, the ISO gain method used can result in some totally different outcomes, requiring different ways of using your ISO to achieve the best results with the least amount of noise.
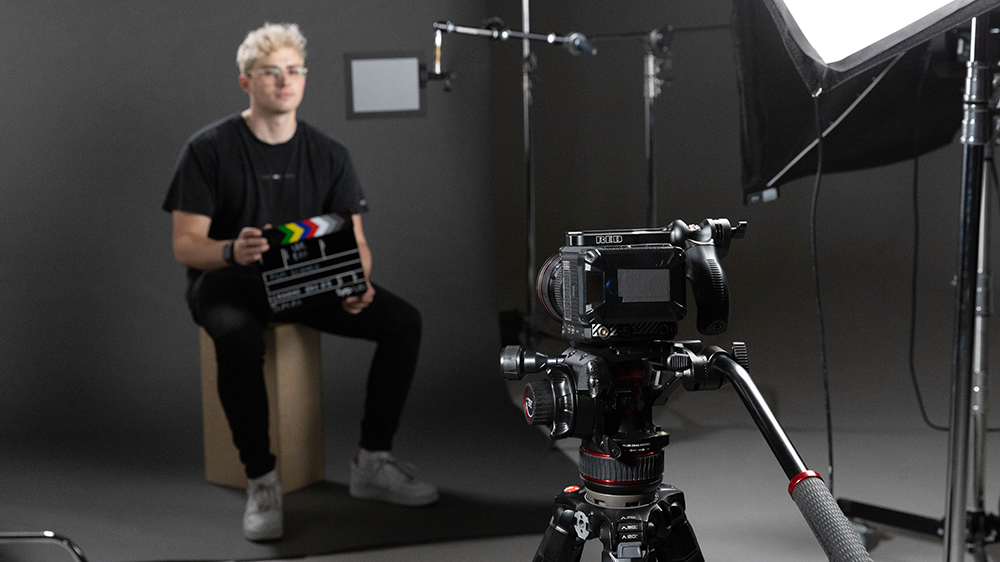
Putting ISO gear methods to the test
To test the ISO on different cameras, we used the Red Komodo that does ISO completely digitally, the Canon R5 that deals with it electrically and A Blackmagic Pocket Cine that harnesses the power of the secret third way – otherwise known as Dual Native ISO.
Low-light noise testing
To test how each camera performed in low light, we set up a super dim scene correctly exposed at ISO 12800. To see the amount of noise, we cycled down through each ISO in the camera, bringing the footage back up to that initial brightness in post-production to see the noise present.
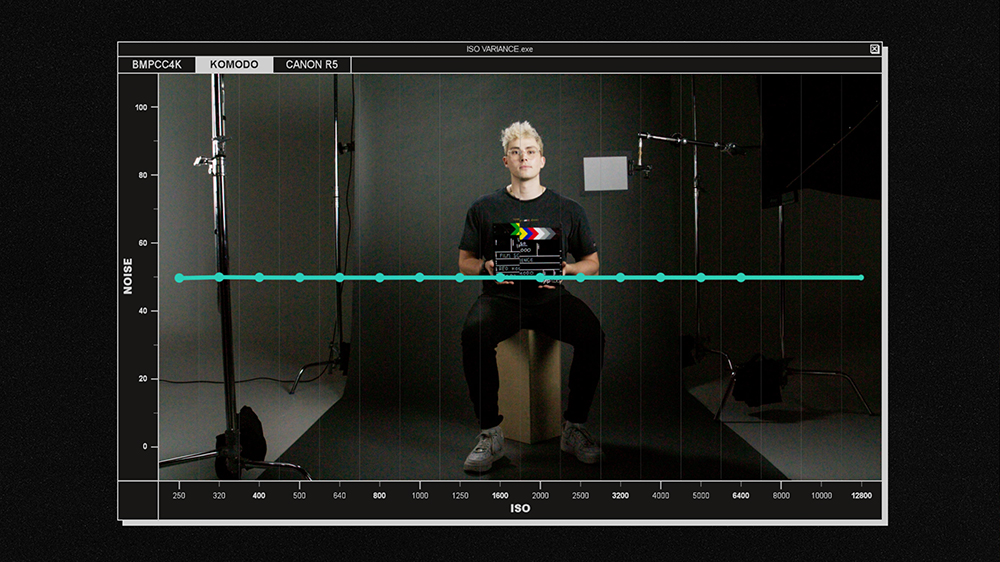
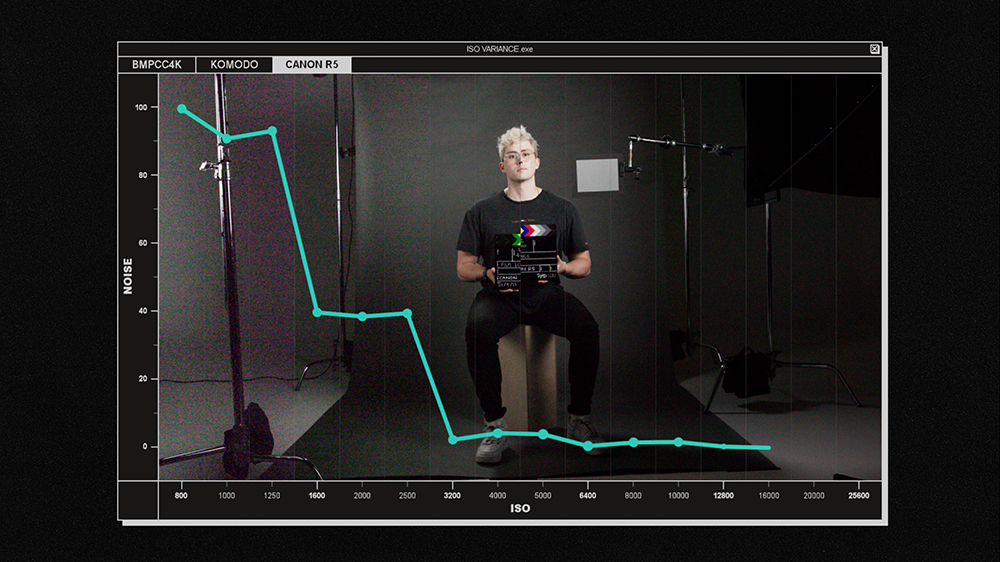
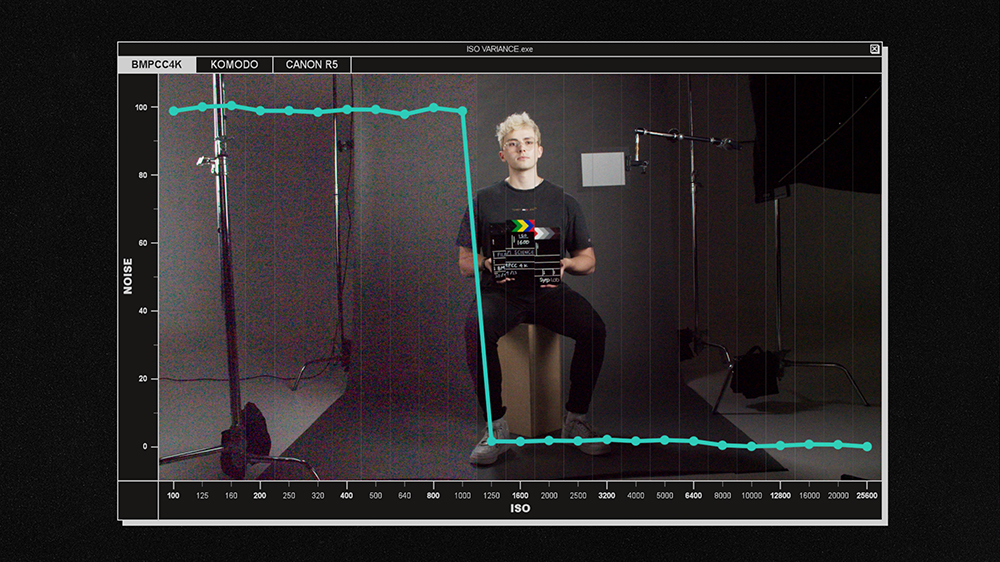
During the test, we saw a pretty clear difference between the cameras. The Komodo had an equal amount of noise at every ISO. The Pocket Cine had two distinct 'bands' of noise, while the R5 was similar but with a whole lot more bands.
So why is that, and what does it reveal about ISO?
The ISO Families
When it comes to the method of ISO, these three cameras represent three families.
ISO-Invariant
First up is the ISO Invariant family, like the RED Komodo. This camera has one fixed ISO; any changes to the ISO number are just digital changes to the RG and B values. The camera saves your RAW footage and the ISO number you selected as Metadata and applies it in post. The ISO where there is no digital boosting is called the Native ISO.
ISO Variant
Next in the family are ISO Variant cameras. A lot of DSLRs used this system, and some mirrorless cameras, like the R5, probably still work this way. The camera takes the voltage from the sensor boosting it by different amounts through an amplifier to give us various ISO steps. The additional steps in between are filled with digital boosting.
If your camera is in this family, you have one Native ISO, multiple other secondary 'Analogue Boosted ISOs,' and a bunch of other digital steps in between
Dual Native ISO
The final is our secretive family. These are Dual Native ISO Cameras, like the BlackMagic Pocket Cine or the Sony A7sIII.
These are similar to the ISO Invariant cameras but have the added bonus of two analogue circuits on the sensor. One deals better with higher light situations, while the other deals with lower light situations, with all the steps in-between done digitally. This results in 2 bands of ISOs and 2 'Native ISOs'.
Industry secrets
Now we have to add a bit of a disclaimer here. There's some solid disagreement between manufacturers and blogs about whether this is done with gain amplifiers boosting the voltage or the sensor having two capacitors allowing it to be more light-sensitive. But because it's such a closely guarded secret, we can't be sure exactly how it works in every camera, and honestly, both methods might be true. However what we do know is what effect these three families have on the final footage
Effect on final footage
Which family your camera is in will impact how noisy your footage is across the range of ISOs. The signal is boosted digitally for an ISO-Invariant camera, meaning the amount of noise is equal across all ISOs. With each step up of this Digital ISO, you will see more noise. Going to a higher ISO never creates more noise, but we are bringing up the footage to be able to see it.
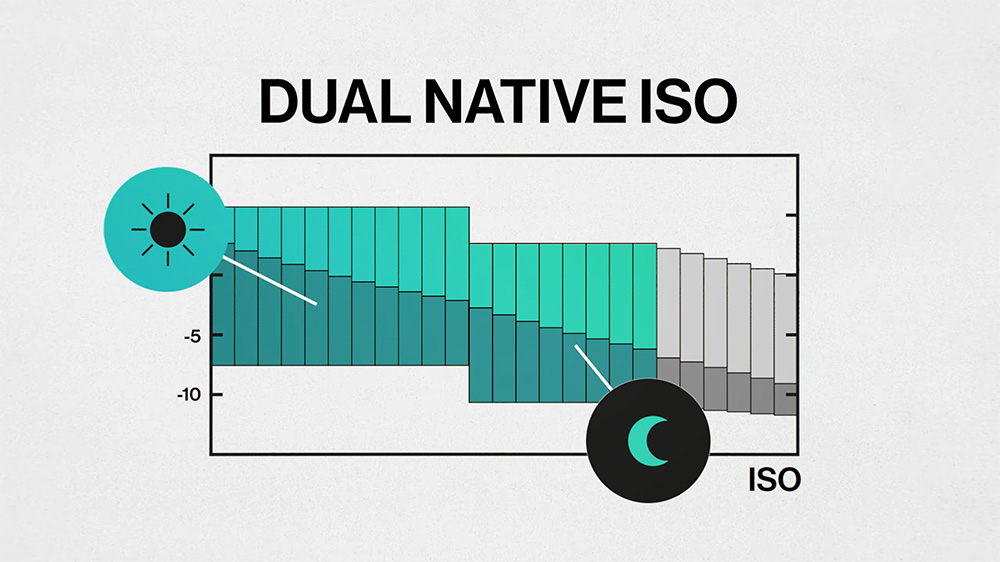
For a Dual Native ISO camera, you have 2 'bands' of noise. Between 100 and 1000, the noise amount is the same with the digital ISO making it more visible, and then at 1250, where the second native ISO kicks in, you have a second band of reduced noise.
This means that ISO 1250, at the bottom of the second band, will have less noise than ISO 1000, at the top of the first band, because the signal is being processed or boosted by a more sensitive circuit.
Finally, our Variable ISO cameras have similar bands, just more of them. In the case of the R5 in our tests, it looked like every 3rd stop was boosted electrically with digital stops in between. Around ISO 6400, it gives up, and it's all digital.
Turn down the noise
But why does noise even exist in low-light environments, and what can we do about it?
Every sensor has some noise, so it's inevitable. Pretty much everything electronic creates some electromagnetic radiation, which interferes with our analogue signal and creates signal noise.
Think of it as a super quiet hum in the background. Let's call it our 'noise floor'. We don't notice it, except when we try to focus on really quiet sounds or turn the volume up. In video we notice it most in the dark parts of our image where our light values are lower and are sitting close to this 'noise floor'.
This is fine when we're using our camera at its Native ISO and not boosting the image too much digitally or electronically because the noise is minimal. But when boosting these values makes our small values bigger, we also bring up the tiny noise values, making the noise more visible.
And as a general rule, Analogue boosting has historically been better at bringing up the values while not raising the noise floor too much.
Nailing the least amount of noise
So should we just shoot everything at the lowest ISO possible and bring it up in post? Well, no, not really.
In general, you want to shoot as bright as possible without clipping and then bring the gain or exposure down in post to push your noise floor down and have the best noise performance. This is referred to as expose to the right, and ideally, you should adjust your lighting, aperture, and maybe shutter to shoot at your camera's Native ISO.
Of course, this differs when you have no choice but to increase ISO, don't have control of the lighting or are already as open as possible. In this case, if you have an ISO Variant camera or if you're shooting compressed footage like H.264 LOG, you should adjust your ISO up until your footage is correctly exposed. Shooting at your native ISO and then bringing your footage up in post will result in noisier footage.
If you have a Dual Native ISO camera and you're shooting in RAW, you should shoot at whichever Native ISO gives you the closest to the correct exposure. You're better to move up to the second Native ISO than shoot at the first underexposed. But remember, all the changes within the band can be modified in post for the same effect.
And if you have an ISO invariant camera shooting in RAW, changing your ISO in the camera won't affect the RAW footage because it saves your ISO as Metadata. The changes in the camera are just a helpful preview tool to see how your footage will look when it's digitally boosted.
Want more filmmaking and photography tips and tricks? Subscribe to our YouTube channel and never miss an episode.