
Better films every fortnight. Subscribe to Syrp Lab YouTube.
The video portrait is a fine art. It’s got to be well-shot with personality, interesting locations, clean audio and a decent amount of heart and soul. But, to get a slick finished product, you don’t actually need a fancy lighting setup. We decided to harness the power of natural light to demonstrate how it’s done.
We are in the age of video, that much is undeniable. In the ongoing competition for shortening attention spans, magazines, blogs and publishers are moving more towards video portraits to capture the movement and life of their subjects.
Like any art form, there are great video portraits and there are….dusty ones. So, how do we shoot a really great one? Most creatives start with natural light because lighting is expensive. Natural light can work really well when you nail down a few variables. That is, making the most of your location and getting the right lighting on your subject for shots you’ll actually be stoked with.
For this project, we headed to the coast with a Sony FX-3. We started off by getting our inspiration and vision clear, booking our crew and planning the finer details. But more on that later.
For now, let’s start by hitting the road for Whatipū, on Auckland’s west coast.
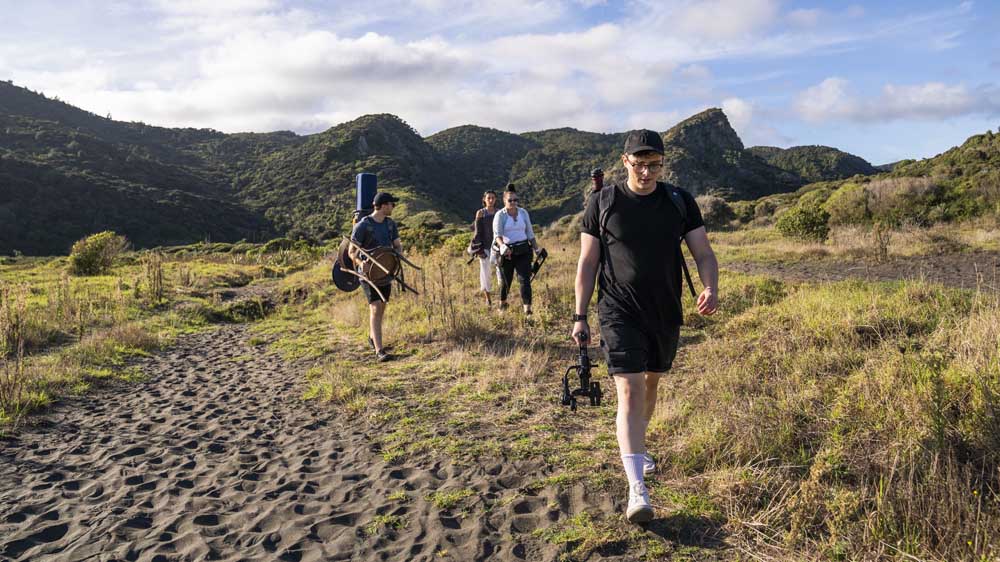
Location one: the beach
Like a great building or your pet dog, a video portrait is all about personality. You’re wanting to create a connection between the subject and the audience, and people like character.
Location plays a big part in this, which is why we scouted ahead of time. We did a recce to Whatipū the night before and made note of the locations we liked and how the light from the setting sun interacted with the environment. Fortunately, it’s a spectacular place.
We wanted to have an idea of where the light would look best on the model, and where they would sit well in context. Scouting isn’t always possible with time restraints, but if it’s an option, we’d say always take it.
To set ourselves up for a successful shoot, we made notes of lighting conditions and key times so we had a rough idea of the order and direction we’d be shooting in. Golden hour goes fast on set, and it pays to be prepared.
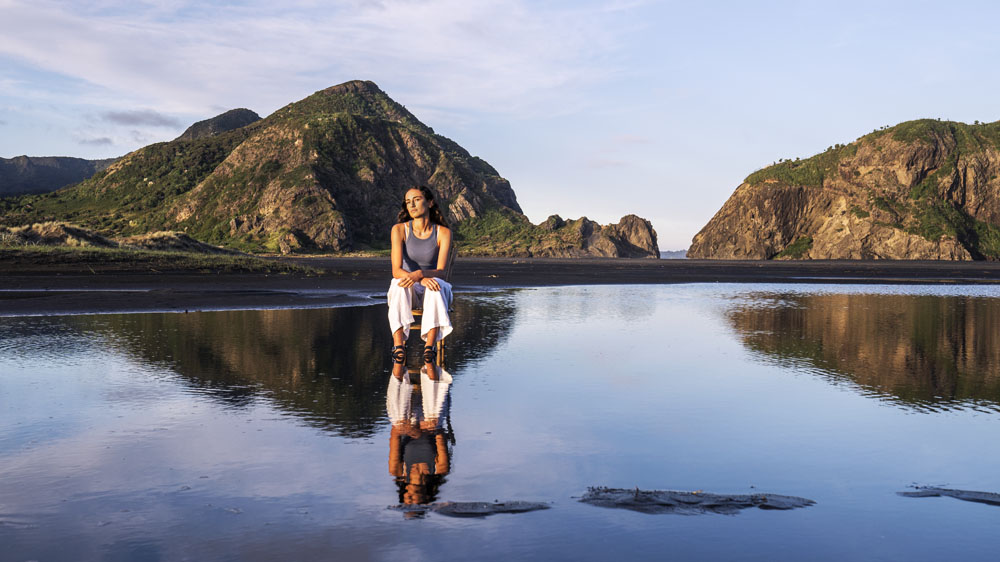
We started with a wide shot first up while the light was catching the hills, because this celebrated the best of the location. When framing up the shot, we needed to make the most of the sun, which was setting behind us and throwing golden light directly onto our model, Alaina.
We needed to take all this into consideration when orienting Alaina; as she rotated around, more light wrapped around her face. We experimented to find the angle that accentuated her features best.
We decided on a set-up that we were stoked with: a chair in a pool of water on the sand giving epic reflections of the surrounding mountains. We got everything onto the Manfrotto 300XM gimbal, and hustled to get a few shots before the chair sank into the sand. Ahh, the joyful unpredictability of shooting in nature.
We decided to shoot the whole portrait at 100fps for a few reasons. Firstly, when slowed, it gives a dreamy, introspective effect. It also means all our shots were smoothed by a factory of 4 when played back. Combined with the gimbal, which counteracted any walking movement, we had ourselves some seriously smooth, buttery shots.
Now, it was a matter of shooting everything we could before the sun went down. Fortunately, we were using some pretty fast lenses which can go down to f1.4, so these bought us more time.
When we hit blue hour and the sun got into the perfect position, we put the Sony FX3 back onto the gimbal and the Manfrotto Fast GimBoom and got some walking shots, which would add some momentum to our edit. By this stage, we were starting to lose light, so we called it a wrap.

Location two: the big smoke
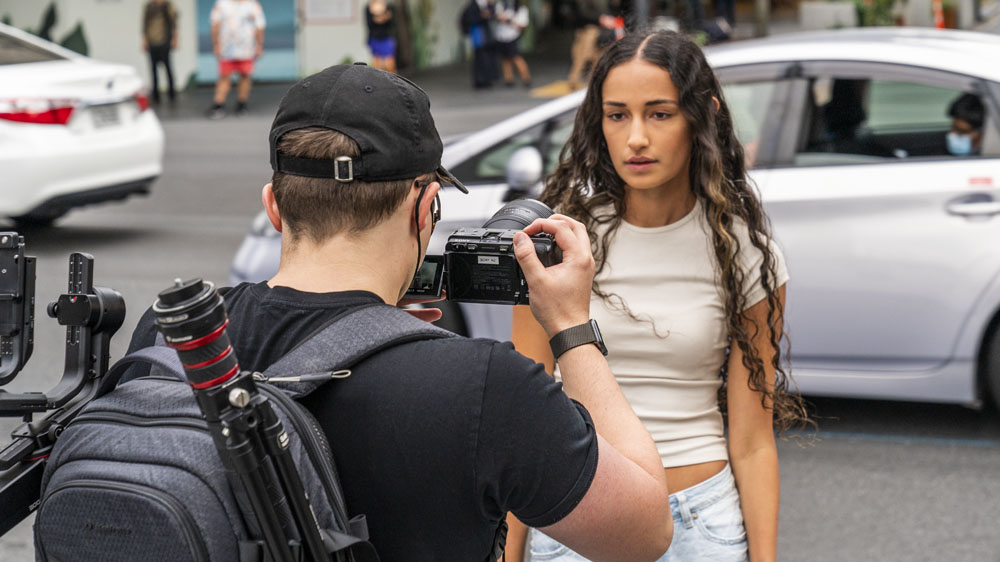
We chose lower Queen Street to shoot the second half of this video. Quite the juxtaposition, right? We wanted lots of movement and action to contrast our beach scene. It was a grey day, so while we weren’t sure if we’d get a banging sunset, we definitely had diffused light for the evening.
We framed up our first location, looking for leading lines down the main road. This happened to be in the middle of the road, so our shooting window was about 40 seconds as the green man flashed at the lights. Nothing like a bit of pressure to add to the creative process.
Alaina was in the middle of the road, so we figured it was wise to have a spotter. Fortunately, we had on our team a multi-tasking make-up artist and light spotter. Shot-wise, we wanted to get a wide, a middle and then a couple of close-ups. This was going to give us the pace we wanted in the cut.
When shooting video portraits, it’s good to give your subject context for being in the space, and add some other action so they’re not just posing the whole time. We gave Alaina a vintage camera, and had her take photos around the city.
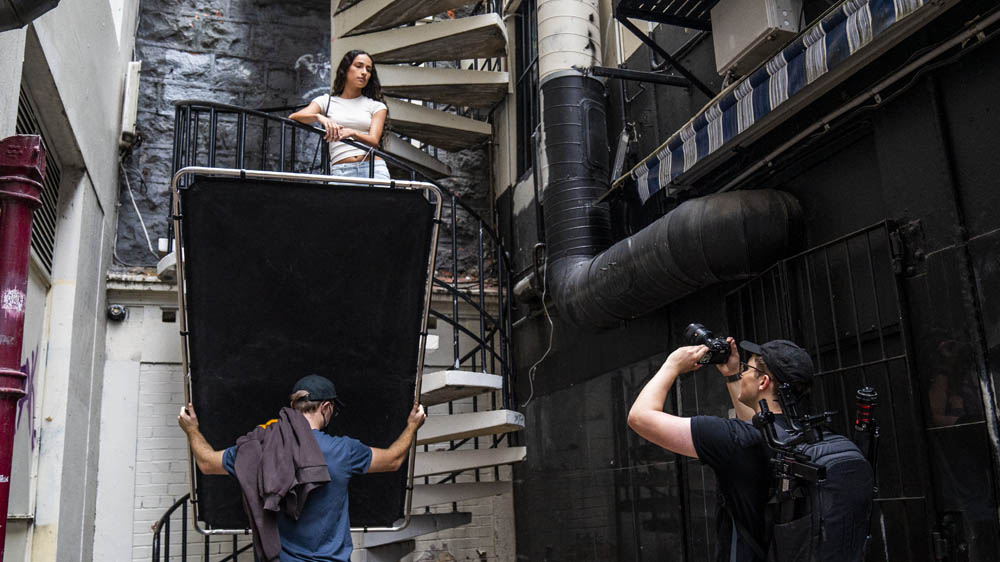
Then, we found a cool little alley that we liked the look of, but the lighting was a bit flat. We added a bounce on camera left, which created some contrast and popped Alaina off the background.
That being said, for most creatives making a video portrait, a large scrim is definitely a luxury. On run and gun shoots you can usually get away with a small pop-up reflector that has a bounce, negative and diffusion.
The sun was setting fast, and we boosted to our final shoot location: Queen’s Wharf. We were determined not to make the same mistake as last time, and continued shooting until the sun had set completely to get all the juicy pink and blue light.
To round off our portrait, we wanted shots that had a good amount of energy as everything would be slowed down. That meant changing the poses up to work with the environment - there were some cool details lower down that we wanted to emphasise, so we played with Alaina’s level.
We wanted to get as much of the light on her face as possible, and we squeezed every last shot out of that golden hour. Eventually, the sun’s departure and a few security guards brought our blissful shoot to an end. Time to go, but we had what we wanted.

Back to the lab for audio
With everything shot, we headed for the studio to record a VO. But first, a quick reflection. Back at the studio after our shoot at the beach, we realised we’d had a slight glitch. We figured out that we started shooting an hour before we had done the recce, which meant we would have still had at least a half-hour of decent light left if we’d bumped up the ISO.
A bit of a hiccup and a waste of good light, but a valuable lesson learned on shooting in nature - sometimes no matter how much prep you do, things don’t quite go to plan. Another day in the (film) school of life.
Anyway, back to recording audio. We wanted to complement the visuals with a short narrative that would make the audience feel like they knew Alaina, and were getting an insight into her world.
When it comes to mic choice, you’ve got a couple of options. There’s the on-camera shotgun (like the Wavo Pro) which would be easiest, but it’s most suited to run and gun vlogging or capturing sound out on set. This is because of its form factor and noise reduction, which removes a bunch of bump and wind noise.
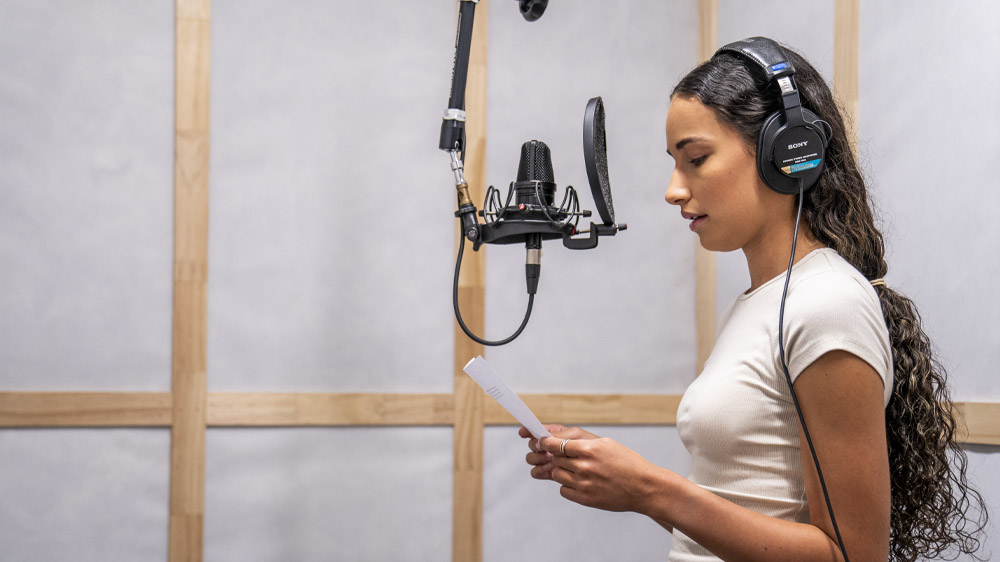
We decided to set up an AUDIX A131 in the sound room. It uses a Cardioid Condenser with a wide diaphragm that has a pretty neutral frequency response, which would give us a rich, natural-sounding voice once mixed. We’re making connections here, after all. It’s good to keep in mind that different mics suit different contexts, so choose the one that’ll suit your project best.
We did a few takes in our sound-treated booth, which removes almost all reverb and reflections giving us clean, rich and silky smooth audio. We’re pretty stoked with our little sound lab, and if you want to see how we build it, jump into the comments and let us know. An episode of Film Builds might be coming your way.
Grading
With the edit done, it was time for Matthijs to take over and work some colour magic. One of the perks of using Davinci Resolve is the inbuilt colour space conversion - this can be done
in Premiere, but you’ll need to use a conversion LUT.
Matthijs started by correcting the tone shifts throughout the evening, adjusting exposure, contrast and colour temperature. With all the footage corrected and flowing smoothly, it was time to create the grade. After collecting some references, we decided on an old school faded film look with retro street photography vibes.
First up, warp the colour. This is the trick to getting those nostalgic vibes; vintage films manipulate colour into a few hue bands, which makes the colours complementary. A classic example of this is Teal & Orange, but that’s just the beginning of all the possible combinations.
When you’re doing this, leave the skin tones alone, as it can very quickly feel overprocessed and become offputting. Lifting and clamping the blacks so that nothing is ever 100% black will fully achieve this faded look.
The FX3 and Sony Lenses create very crisp clean footage. However, as we are emulating old school vibes, the addition of some subtle glow and diffusion will help soften the footage. Adding some film grain also helps to further push the vintage feel.
Like this vintage grade?
Well, it’s yours - we’re making it available as a LUT download for free on a Patreon page.
Final Video
There you have it: a slick portrait video, without the fancy lighting. Whether you’re a seasoned filmmaker or just getting started, these tips should help elevate your project, whatever you’re working on. If you liked this one, subscribe to Syrp Lab - we only send emails worth getting. See you at golden hour.