Better films every fortnight. Subscribe to Syrp Lab YouTube.
Mark Gee of the Art of Night is an award-winning astrophotography wizard who dedicates hours to scout, set up, shoot, and skillfully edit stunning astral scenes. In this tutorial, he guides us through the complete process, from start to jaw-dropping Astro time-lapse.
Now, star-shooting is one thing, but what about the combination of Astro and motion? Mark is an expert when it comes to bringing time-lapse and astrophotography together. That made him the perfect person to go to for some tips. Mark walks us through his process of capturing a star motion time-lapse using the Syrp Genie, which is his favourite way of getting insane visuals of the rotating night sky, over a dreamy landscape.
Like all endeavours in astrophotography, this one’s going to require a bit of planning, a bit of patience, some solid gear and all of your spirit of adventure. Let’s go.
1. Scouting for location
When hunting out a good spot, Mark looks for interesting foreground features, be they rock formations, trees that can silhouette against the stars or waterways that reflect the night sky.
The more creative you can be, the better, and if you’re willing to scramble that little bit further off the beaten track, your shots will reward you for it. In this case, Mark’s foreground is himself with a campfire and his main star feature is, of course, the Milky Way.
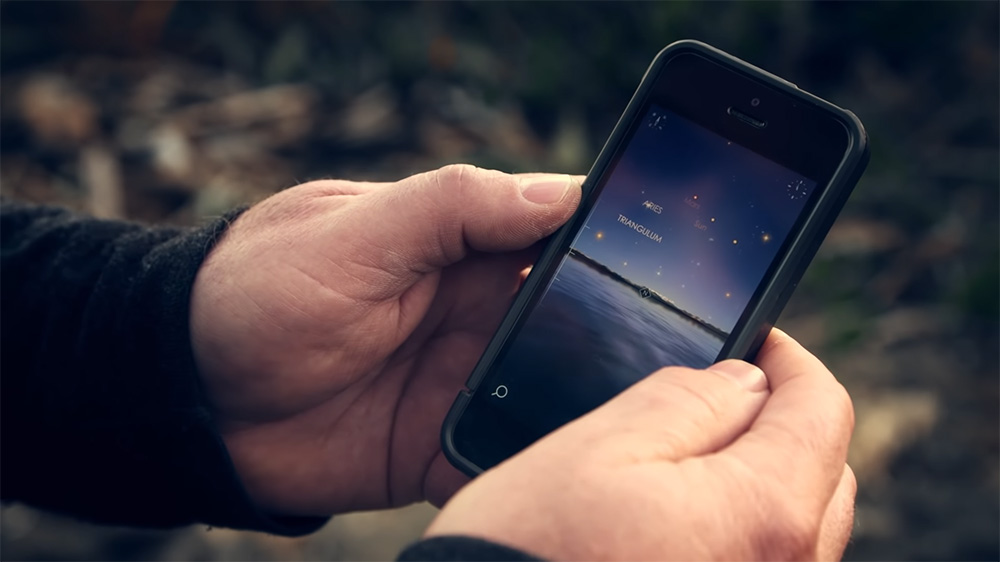
Compose your frame with the night sky in mind, and that starts with knowing what’s going on up there. Mark uses PhotoPills, a great app with insight into all things astro. The best time to shoot the stars is during the new moon period, and the app has both a moon calendar and a 2D moon planner so you can see the position of the moon at any given time from your location.
Another app which compliments PhotoPills is StarWalk, which harnesses your phone’s GPS capabilities to produce an on-screen rendition of the constellations that should be visible from your location. You can also point it up at the night sky when stargazing for some intel on what you’re looking at.
Mark leaves himself plenty of time to set up when he gets to a new location, as it can take longer than you might think. You don’t want to miss the Milky Way in all its glory whilst you’re still fiddling with your gear. On that note, let’s take a look at what kit Mark brings with him.
2. The gear list
Mark uses the Syrp Genie, which acts as both his motor and his intervalometer, and is compact enough to haul along to far flung locations. This is attached to a Magic Carpet slider for linear movement. Mark uses a Canon 6D and a 14mm lens.

3. Get dialled
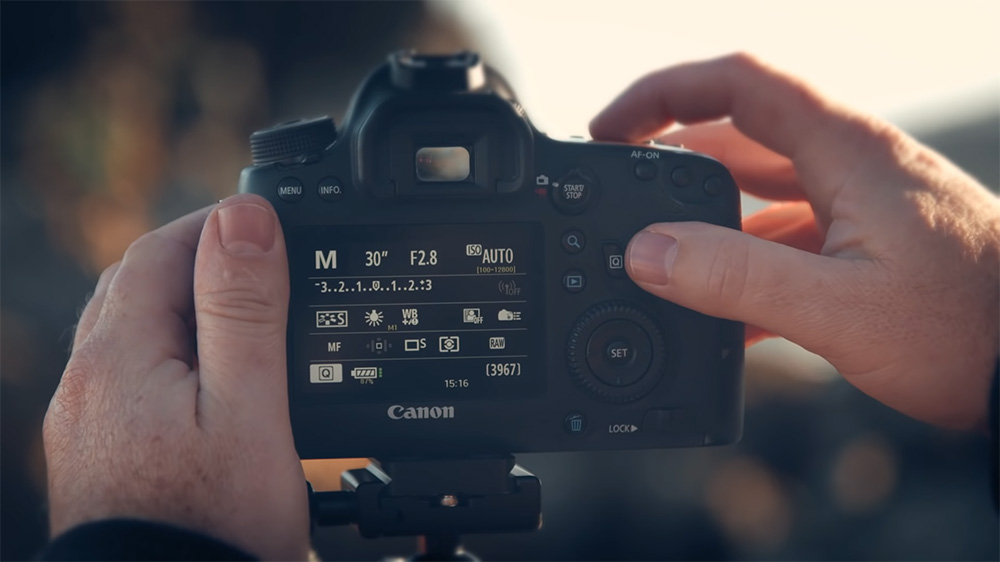
Mark always shoots his Astros in raw for uncompressed images, to allow for maximum freedom in post-production. He also turns off long exposure noise control - having it on will double your exposure time which isn’t ideal for a time-lapse. Turn off your image review to save battery and set white balance to one of the presets - Mark usually uses the tungsten or incandescent preset. Since you’re shooting raw, you can change the colour balance back in the editing suite.
Make sure your focus is in manual, and then set your exposure. Since Mark’s shooting in a dark environment away from city lights with a 14mm lens, he sets his shutter speed to 30 seconds, with an aperture of f/2.8 and an ISO of 3200. This ISO will of course vary depending on your environment, camera, and lens.
A good way to find the right shutter speed to reduce star trailing is to use the 500 rule. For a camera with a full frame sensor, just divide 500 by the focal length of your lens. Yes, you’re allowed to use a calculator. For your aperture, it’s best practice to open it right up and set it to your lens’s lowest f number, as you want as much light passing through as possible.
Mark prefers an ISO between 3200 and 6400, but not all cameras can handle a high ISO, and might start to give noisy images. He recommends starting at 1600 and working your way up from there.
4. Set your parameters
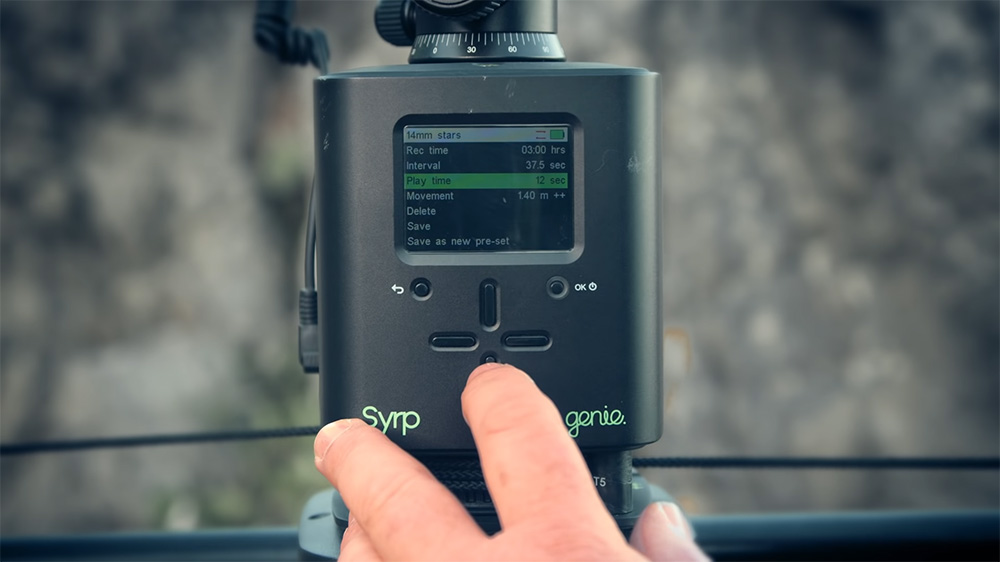
Because you’re shooting at night, it’s important to set up a move, shoot, move sequence - that is, allowing the camera to stop completely to shoot for a razor-sharp image. To do this, you’ll need to set up your timing parameters. This involves choosing your recording time (how long you want to shoot for) your interval time (the time between each photo) and your play time (how long your final sequence is).
For your interval time, the general rule is to set it 5 seconds longer than your exposure time. You also need to allow for the move shoot delay, which is the time between when the motor stops moving and when the photo is taken. See, this is why Mark’s in charge. This move shoot delay is set at a default of 400 milliseconds. Then, you’ve got your 30 seconds of exposure.
After this, you need to leave enough time for the image to save to the card, which shouldn’t take longer than 3 seconds. This brings us to a total of about 33.4 seconds. To be safe, Mark applies the 5 second rule and sets the interval at 35 seconds.
Your record time and play time are interdependent. Usually, you want about 15-20 seconds of footage at the end, as this gives plenty of wiggle room to get rid of frames later and tighten the sequence up. You’ll see your record time adjust itself accordingly. Now for our linear movements.
The track slider allows for 1.4 metres of movement, so Mark programs his distance for 1.4 metres. By changing the ‘Ease In/Out’ to 4 seconds, he adds a slow ramp up and a slow down at the start and end of the timelapse, which gives it a really nice softening effect.
Enjoy the last of your campfire, maybe even toast some marshmallows, and then it’s back to the editing suite.
5. Post production
For editing, Mark uses Adobe Lightroom, exporting his final video with LRTimelapse. LRTImelapse is the creme de la creme for time-lapse photography, with capabilities for editing, keyframing, grading, rendering and smoothing out exposure changes, which is especially helpful for day to night time-lapses.
Mark could navigate LRTimelapse with his eyes closed and is kind enough to walk us through his process. His secret to capturing both the campfire and the Milky Way in one exposure was that it wasn’t really a campfire - it was glowing coals which he would stoke to get sparks coming out. Sneaky, and effective.
Processing tends to be pretty personal and subjective when it comes to astro. Mark likes a natural look and recommends keeping processing to a minimum - you don’t want to end up with random artefacts in your time-lapse. The first thing Mark does is getting the whole image neutral, in colour and balanced out.
In Lightroom, go to the Develop module and neutralise the white balance. A good way to see if you’ve got it neutral is to crank the saturation slider up to max, check out the white balance of your image, then swing your saturation back down to zero.
Now, for lens corrections. Mark goes to the profile for the 14mm Canon lens he shot his time-lapse on and enables the profiles. He also removes chromatic aberration, which gets rid of any vignetting. If the profiles overdo these corrections, you can jump into manual and readjust.
Now, jump to basic settings and set your white and black points. To see if you’re going too far or not, hold down the option key and have a play on the slider. At this stage, the image will still be looking flat, but you’re about to make it pop with some more processing. Go to the clarity slider and have a play, but a word of warning - don’t be to trigger happy, you can really ruin your image by overdoing it. Mark sets his at around 20.
Next, he adjusts the tone curve, playing with the lights and the darks. With the clipping, you can tell if you hold your mouse over the histogram exactly where it’s clipping on your image. If it seems to have a little too much green, you can head back to the white balance and cool it down. This will depend on the preset you have on your camera, too. Have a play with the tint if you feel it needs it, too.
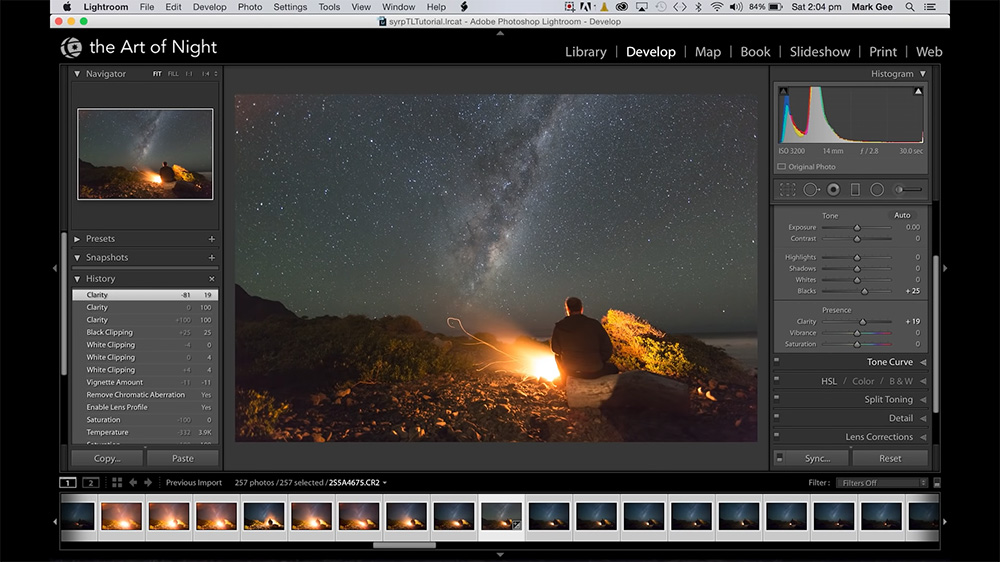
These have all been global adjustments. Now, it’s time for some local ones. Mark likes to use the ramp tool for these. Add a graduated ramp and pull it down over the sky. Then, go ahead and play with the contrast, the highlights, the whites, and the shadows. He likes to darken the top of the sky and push the whites to bring out the brightness of the Milky Way. It’s always a good idea to look at your thumbnails, too, as they can show you how your image looks overall.
To bring out his subject (the Milky Way, the campfire and himself), Mark adds a little more vignetting in the lens corrections. Again, be careful not to overdo it. Now for a technical cleanup and some noise reduction.
Mark goes to the Radial Filter tool, draws out a radial area over the area that needs cleaning up. Select Invert Mask, then reduce the saturation and take the exposure down if needed. If it’s too noisy, here’s where you can reduce some of that too. To do a global noise reduction, head over to Details, and reduce the luminance on the slider - Mark usually works between 30 and 50. To fix any purple mottling, you can push your colour noise reduction up a little bit to smooth it out.
When you’re happy with your image (and you can use before and after to check out your handiwork) it’s time to apply these settings across the rest of the images. Select the image you’ve just processed, select all images, then synchronise all the settings. Now, you’re ready to export. Select all images, then File → Export to LRTimelapse. Mark keeps it basic here, naming his sequence and setting it as JPEG at 8Bit. Hit export, and head for LRTimelapse.
In LRTimelapse, which opens automatically once these images have been exported, select your Codec, your output size, your frame rate and your quality - and away you go. Matt usually exports in ProRes, and in this case, he only needs a 1080 HD version. Click Render Video, and voila! Your Star Motion Time-lapse is good to go.
If you’ve made it this far, congrats! It’s quite the process, but well worth it for a world class time-lapse. For the nitty gritty details, we’d highly recommend watching the video.
No two starscapes are the same and we’d love to see what you came up with. Jump into the comments or flick us an email, and if you’ve got any other hungry Astro photographers in your life, by all means share this with them.
See you out there.